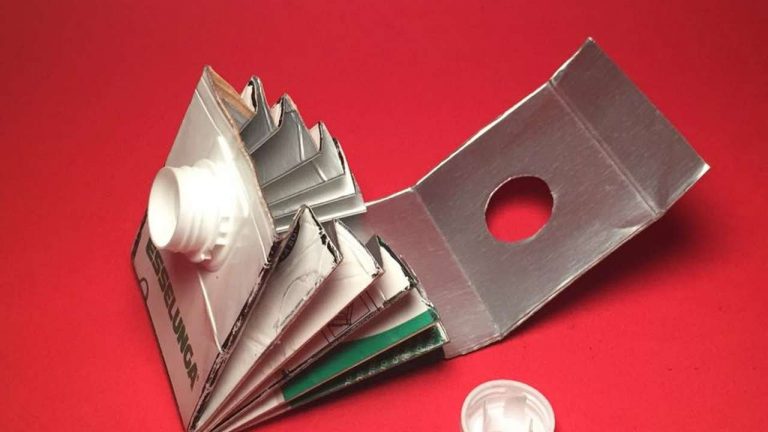
Today we’re going to talk about milk cartons. Reusing long-life packaging to create wallets is a smart and creative way to use materials that would normally be thrown away. This craft project is not only a great way to recycle, but it also results in unique and stylish pieces. Next, you’ll learn how to transform a simple milk carton into a functional and stylish wallet.

Materials Needed to Make the Wallet
To start creating your milk carton jewelry box, you will need to gather some specific materials. The base of the project will be an empty and clean milk carton, which will give shape to the jewelry box. For the interior lining, use a 25 x 35 cm piece of acrylic sheeting, which will provide a soft and protective layer. In addition, two scraps of printed fabric, with the same dimensions (25 x 35 cm each), will be used to cover the outside and inside of the box, giving color and style to the final object.
To finish the edges, a meter of black bias tape will be used, giving a refined touch to the work. The jewelry box will be closed with a large button, which will also serve as a decorative element. To secure the button, a 30 cm piece of round, black elastic will be needed, ensuring that the jewelry box closes properly.
Creation of Compartments
As for the adhesives and fasteners, you will need instant glue, ideal for quickly attaching small details, and fabric glue, which will be essential for attaching the fabrics to the cardboard structure of the milk carton. White glue will also be useful for covering larger areas and providing a strong adhesion. To make the necessary cuts in the fabrics and bias tape, scissors are essential. In addition, you will need white thread to sew on the button and reinforce certain areas, along with a thick needle, which will make it easier to sew the elastic and other details that require more precision.
With all these materials gathered, you will be ready to start creating your jewelry box, ensuring a careful finish and a functional and beautiful result.
Milk Box Preparation
Cleaning and Preparation
To start preparing the milk carton, the first step is to clean it and open its sides. Make sure the carton is completely dry and clean, as this will ensure good adhesion of both the glues and the fabrics that will be applied later. Careful cleaning is essential to obtain a perfect finish. Once prepared, apply an even layer of white glue to the colored side of the carton. Then, apply the acrylic sheet over the glue, pressing down firmly so that it adheres evenly across the entire surface. Let this step dry for approximately 20 minutes.
Application of Acrylic Blanket
With the acrylic sheet fixed, it's time to glue the fabric scraps. Apply fabric glue to the acrylic sheet and attach one of the printed scraps, making sure it covers the entire area. Repeat the process on the other side of the box, where the silver surface is, applying the second scrap. After gluing, cut off any excess fabric that is left over, carefully adjusting it so that it is flush with the edges of the box, giving a cleaner and more precise finish.
Application of Fabric and Milk Cartons
The next step involves preparing the shape of the wallet. Fold the milk carton along its longest side, without making too much of a mark on the fold so that it doesn't deform. Then, round off the ends of just one side, creating a flap effect. Open the piece again and fold it along the shortest side, forming two equal-sized parts. The rounded end will serve as the lid of the wallet, which will be closed later.
Wallet assembly with milk cartons
Once the wallet structure is ready, sew the sides of the two equal parts together to form the purse. Make sure the seams are tight to ensure durability. In the center of the rounded flap, make a small hole with scissors and thread the round elastic through, tying a thick knot inside. Apply instant glue to secure the knot. Finally, sew the large button over the elastic, reinforcing the closure.
Personalize Your Wallet Made From Milk Cartons
Once your wallet is ready, you can customize it to your liking. One interesting way to personalize your project is to vary the types of fabric you use. Experiment with different prints to create unique and fun designs. If you like more elaborate crafts, try using the patchwork technique, combining different fabrics to create more complex and eye-catching patterns. If you want an even more practical model, consider adding a strap to your wallet, turning it into a small, versatile bag.
Exploring More Recycling Ideas
If you enjoyed turning long-life packaging into wallets, you might be interested in other creative recycling projects. Repurposing materials is a great way to create unique and sustainable items. Explore other recycled craft ideas and discover new ways to give new life to used materials.
This project is a fun and practical way to contribute to sustainability while also developing your crafting skills. By transforming a milk carton into a stylish wallet, you’re not only saving money, but you’re also creating a personalized piece that’s also eco-friendly.
Learn how to make other arts by recycling, Click here.
Check out interesting facts about recycling clicking here.


