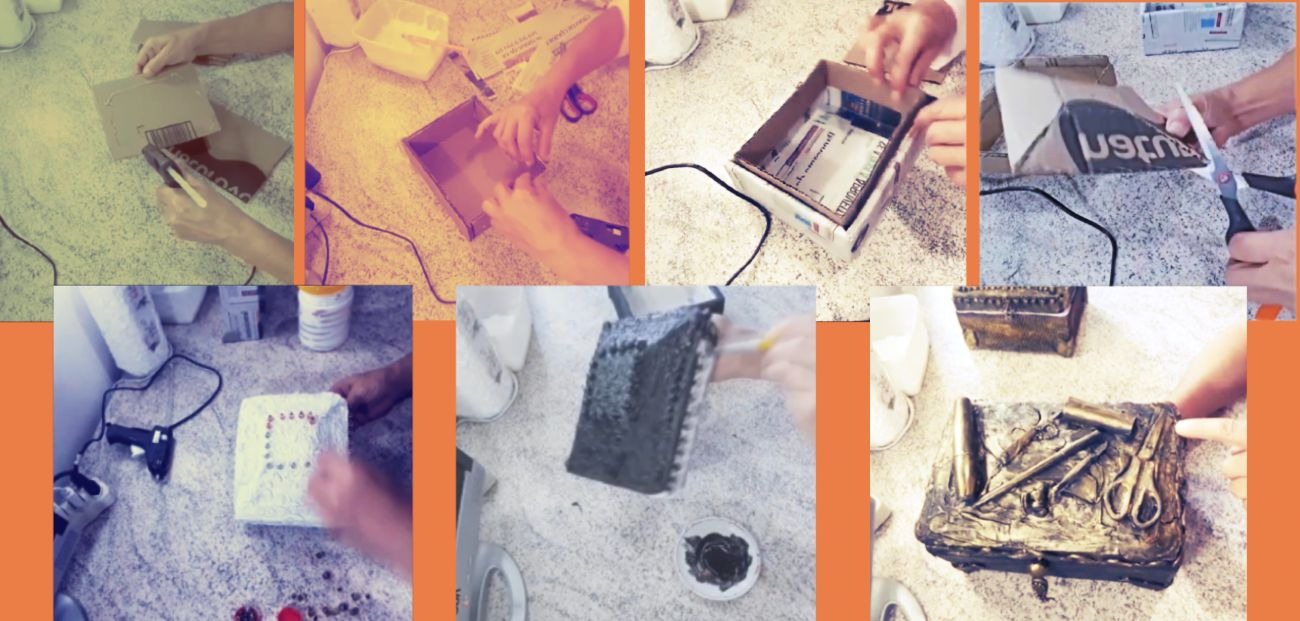
Today you will learn how to make a cardboard jewelry box. But before that, have you ever realized how many cardboard boxes are thrown away every day? In a small house, it is easy to accumulate these boxes, and in a condominium, the number can be even higher. Instead of simply throwing these boxes away, why not turn them into something useful and beautiful, like a cardboard jewelry box? In this post, we will explore how you can recycle cardboard boxes and create a unique jewelry box, as well as discuss the importance of recycling and crafting.

The Importance of Recycling and Reuse
Recycling cardboard boxes is an effective way to ensure that the material is disposed of properly and does not overload landfills. Disposing of cardboard with other office paper is a good practice because it allows the material to be recycled properly. Additionally, crafting is a creative way to reduce environmental impact by transforming items that would otherwise be discarded into useful and aesthetic objects.
Crafts using recyclable materials, such as creating a cardboard jewelry box, offer an environmentally friendly solution and are a fun and economical way to contribute to protecting the environment. In urban centers with rapid population growth, finding places to deposit garbage has become a challenge. Therefore, adopting recycling and reusing habits helps to minimize this problem and promotes more sustainable waste management.
Creating a Cardboard Jewelry Box: Detailed Step-by-Step Guide and Tips
Turning a cardboard box into an elegant jewelry box is a creative and sustainable project. With the right materials and a little patience, you can create something unique and functional. In addition to being a great way to recycle, this type of craft allows you to customize the jewelry box according to your taste. In this guide, we will show you the materials you need, the steps for preparation and how you can make the final result even more special.
Necessary Materials
To get started, you will need a cardboard box in good condition, the size you prefer for your jewelry box. A small box works well for a more compact version, while a larger box will allow you to create a spacious model, ideal for those who have a lot of accessories. In addition, you will need decorative paper or fabric of your choice, white glue or hot glue, scissors, a ruler and a pencil. These are the basic items that will make up the structure and finish of your project.
Initial Preparation
Before you begin assembling your jewelry box, make sure your cardboard box is clean and ready to be worked on. Choosing a box that is in good condition will help ensure the durability of your finished jewelry box. Once you have selected your box, the next step is to choose the decorative paper or fabric that you will use to cover it. Think about the style you want for your jewelry box: it could be more classic, with soft, neutral tones, or more fun and colorful, with bold prints.
Measure the box with a ruler and mark the dimensions on the paper or fabric so that it covers the entire surface of the cardboard box. Cut the material you have chosen, making sure that you have pieces that completely cover every part of the box, such as the sides and bottom.
Box Assembly
With the preparations complete, it’s now time to start assembling the box. If necessary, you can disassemble the cardboard box to adjust it to the size or shape you want. If you’ve already chosen a box that’s the right size, you can leave it intact. If you need to make any changes, cut the cardboard with scissors and fold it until it reaches the ideal shape. Remember to reinforce the folds with glue to ensure that the structure stays firm.
Next, apply white glue or hot glue to the entire outer surface of the box, spreading it evenly. Position the decorative paper or fabric over the glue, being careful to avoid air bubbles or wrinkles in the material. Smooth the surface gently with your hands, pressing lightly to ensure the material adheres evenly. Allow the glue to dry completely before moving on to the next step.
Creation of Compartments
To make your jewelry box more practical and organized, it’s a good idea to create internal compartments. These compartments are ideal for separating rings, earrings, bracelets, and necklaces, making it easier to organize your jewelry. To do this, cut more pieces of cardboard in the necessary dimensions to create dividers inside the box.
You can make simple dividers that run across the box, or you can make more elaborate dividers with multiple sections of different sizes. Use a ruler to measure and make sure the compartments are aligned and proportionate. Apply glue to the ends of the dividers and secure them to the inside of the box. Allow the dividers to dry completely before using the jewelry box to prevent them from coming loose.
Jewelry Box Customization
Now that the jewelry box is ready, it’s time to personalize it even more. This is the time to let your creativity flow and add elements that reflect your personal style. You can decorate the outside of the box with ribbons, decorative buttons, stickers, or even small mirrors. You can also draw patterns or paint details with acrylic paint to add an artistic touch to the project.
If you prefer a more sophisticated finish, consider lining the inside of the box with velvet or felt, which will also help protect your jewelry from scratches. Choose colors that match the decorative paper or fabric used on the outside of the box, creating a visual harmony between the inside and outside of the jewelry box.
Final Touches
Once you’ve added all the details and let the glue dry completely, your cardboard jewelry box is ready to use. It will be a unique piece, made by you, and will have a special charm, in addition to being an economical and sustainable solution for storing your jewelry. By creating a custom jewelry box, you will not only save money, but you will also give a new purpose to materials that would otherwise be discarded.
This project is a great way to exercise your creativity, and it also makes an amazing gift for friends and family. Since it’s fully customizable, you can tailor the cardboard jewelry box to the recipient’s taste, creating something even more meaningful and special.
Benefits of Cardboard Crafts
Creating a cardboard jewelry box not only helps reduce material waste, but also offers a number of additional benefits:
- Economy and Sustainability: Recycling cardboard boxes into jewelry boxes is an economical way to create something beautiful and functional. It also helps reduce waste and promotes sustainability.
- Creativity and Personalization: Crafting with recycled materials allows you to express your creativity and customize items to your personal taste. You can create a unique jewelry box that reflects your style and preferences.
- Education and Awareness: By getting involved in craft repurposing projects, you not only learn about the importance of recycling, but you can also inspire others to adopt similar practices.
Participation and Additional Resources
If you want to learn more about crafts made with recycled materials and the importance of recycling, consider following resources and channels dedicated to the topic. For example, you can subscribe to the YouTube channel of artisan Paula Bitercurd, which offers videos and tutorials on how to create crafts with recycled materials.
Additionally, if you are interested in expanding your skills and knowledge in sustainability and recycling, look for online courses that offer certification and in-depth training in the environmental field. These courses are a great way to gain new knowledge and apply sustainable practices to your daily life.
Turning cardboard boxes into jewelry boxes is not only a creative way to reuse materials, but it’s also a sustainable practice that helps protect the environment. By embracing cardboard recycling and crafting, you can reduce waste and create unique, personalized items. Try these techniques and share your results with friends and family to promote sustainability and creativity in your community.
If you have any questions or would like to share your experiences with recycling soap, please don’t hesitate to leave a comment or contact us. We are here to help and inspire you to make a difference in the world!
Learn how to make other arts by recycling, Click here.
Check out interesting facts about recycling clicking here.


